Hack for Discovered-Currently Not Indexed Squarespace Blog Posts
It’s no secret that many Squarespace users have been struggling to get their “Discovered-currently not indexed” blog posts indexed by Google. All you have to do is join the Squarespace Community Facebook Group or peruse the Squarespace Forum to see this…it’s been a problem.
This is why I am SO EXCITED to share with you something that a fellow Squarespace web designer, Jessica Miller, suggested to me that literally worked overnight.
In addition to Jessica’s brilliant suggestion, Henry Purchase, founder and CEO of SEO Space, also offered me some great advice that piggybacks on Jessica’s solution.
Rename Your Blog Post URLs and Create 301 Redirects
A URL redirect forwards traffic from inactive pages to active pages on your website. This can be for permanent changes (301 redirects) or temporary changes (302 redirects).
To use a 301 redirect, the original URL can no longer exist, and the new one must exist.
You will be deleting the old URLs of “Discovered-currently not indexed” blog posts and replacing them with new ones, so you will want to use 301 redirects.
Jessica Miller, a fellow Squarespace web designer, shared this solution with me. She suggested renaming the URL slugs and creating 301 redirects in Squarespace.
How to Rename Your Blog Posts
If you are like me, you’ve been using your blog post title to double as your URL slug. It’s what I’ve always done and always recommended.
Turns out I was wrong. (Hey, it happens!)
I’m no Google expert, but Henry Purchase, founder and CEO of SEO Space, is. Using the plugin he developed, I learned that the URL slug should be between 4-6 words, and the URLs for my “Discovered-currently not indexed” posts were much longer than that.
In an email from Henry who has been helping me resolve this, he says precisely:
“If you check my blogs, all the slugs are short and sharp - usually only containing my main keyword, such as /squarespace-seo-checklist and /how-to-use-google-search-console”
You heard ‘im! Keep them short and use keywords.
If you’re not sure what your keywords are, try not to overthink this and get stuck in analysis paralysis. Ask yourself, “What is the main idea of my blog post?” and “Who am I trying to attract to my website?”
Identify the “Discovered–currently not indexed” blog posts
If you’re not already, connect your website to Google Search Console.
If you haven’t ventured into Google Search Console, this is the time to do it. Don’t be afraid!
If you’re not yet connected, it’s very easy to do.
In the home menu of your Squarespace website, select Settings > Connected accounts.
Then select ‘Connect Account’
From the list that pops up, select ‘Google Search Console’
A window will open up and you can select the Google Account you want associated with your website.
It really is that easy.
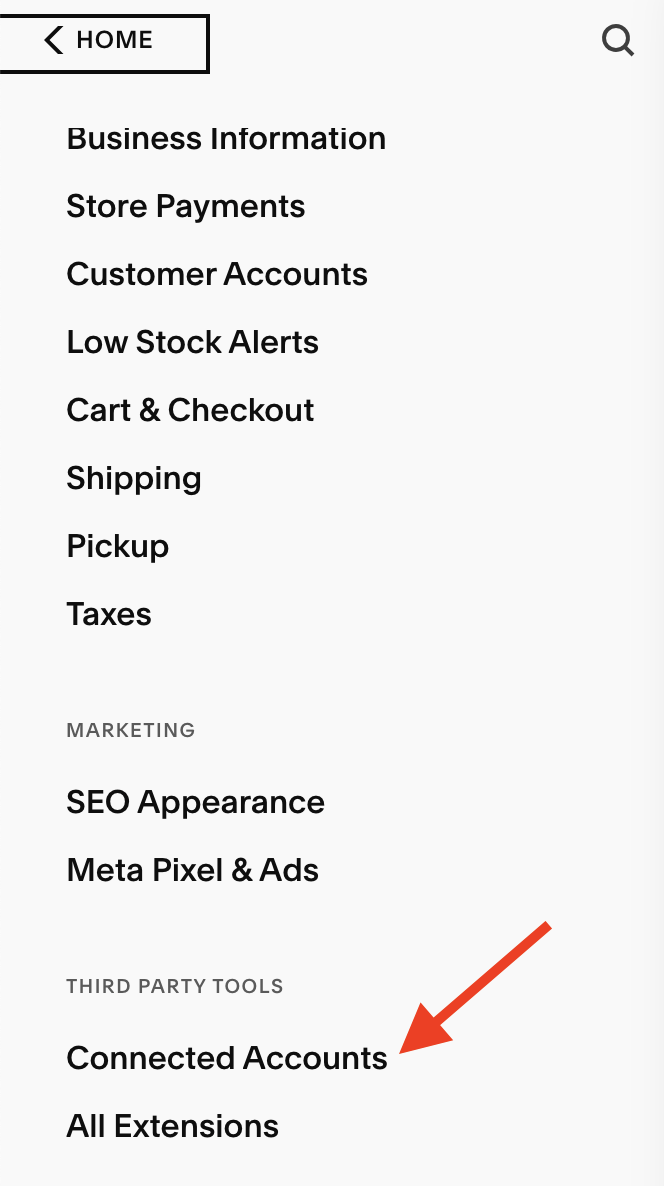
1. Select Connected Accounts
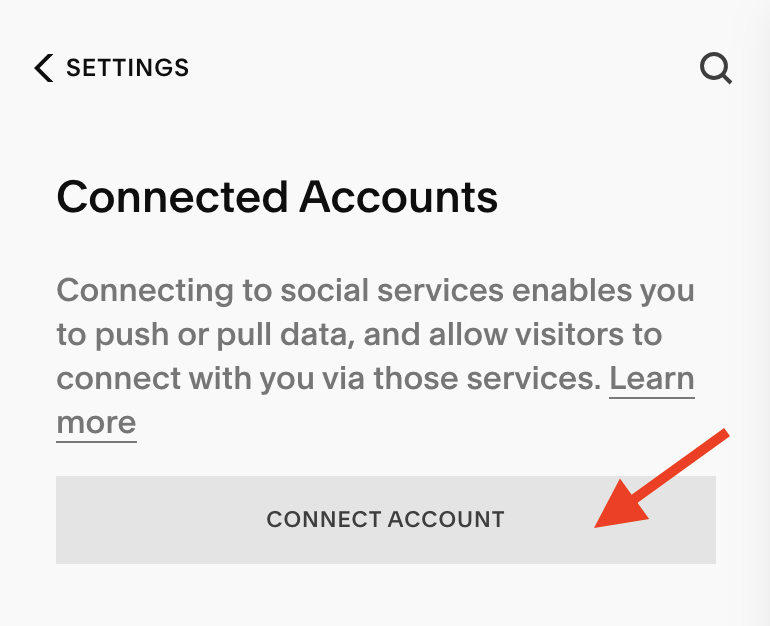
2. Select Connect Accounts
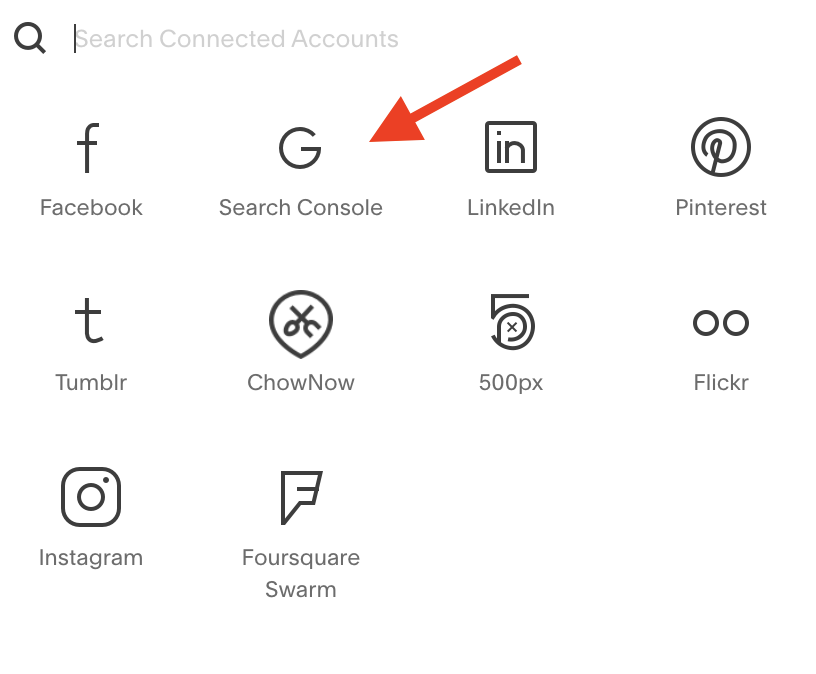
3. Select Google Search Console

Login to Google Search Console
From the panel select ‘pages.’
In upper left corner of the graph, select the ‘not indexed’ box.
Scroll down and find where it says ‘Discovered-currently not indexed’ and click on it.
This is where you will find all the blog posts that aren’t being indexed.
Don’t worry about tags and categories here or any page you actually don’t want to be indexed.
Find the affected blog posts and go to the next step.
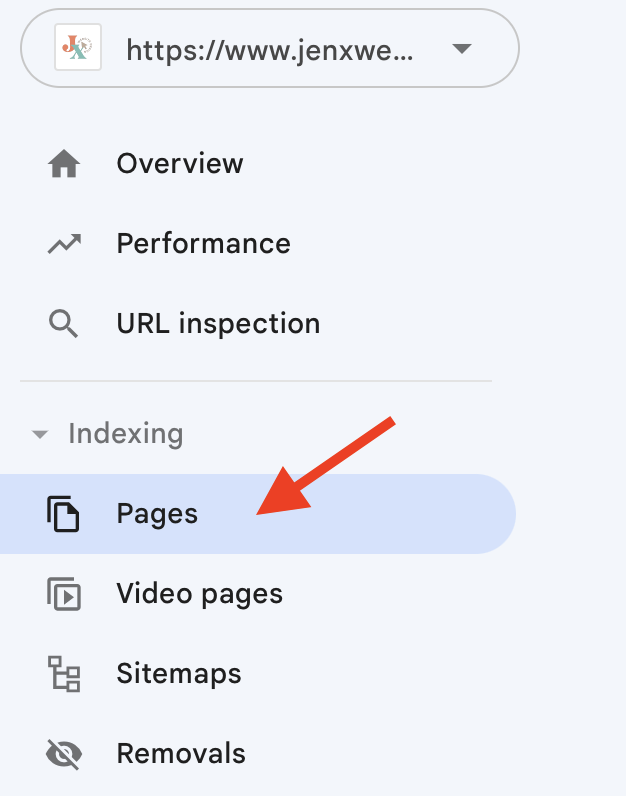
Select ‘pages’
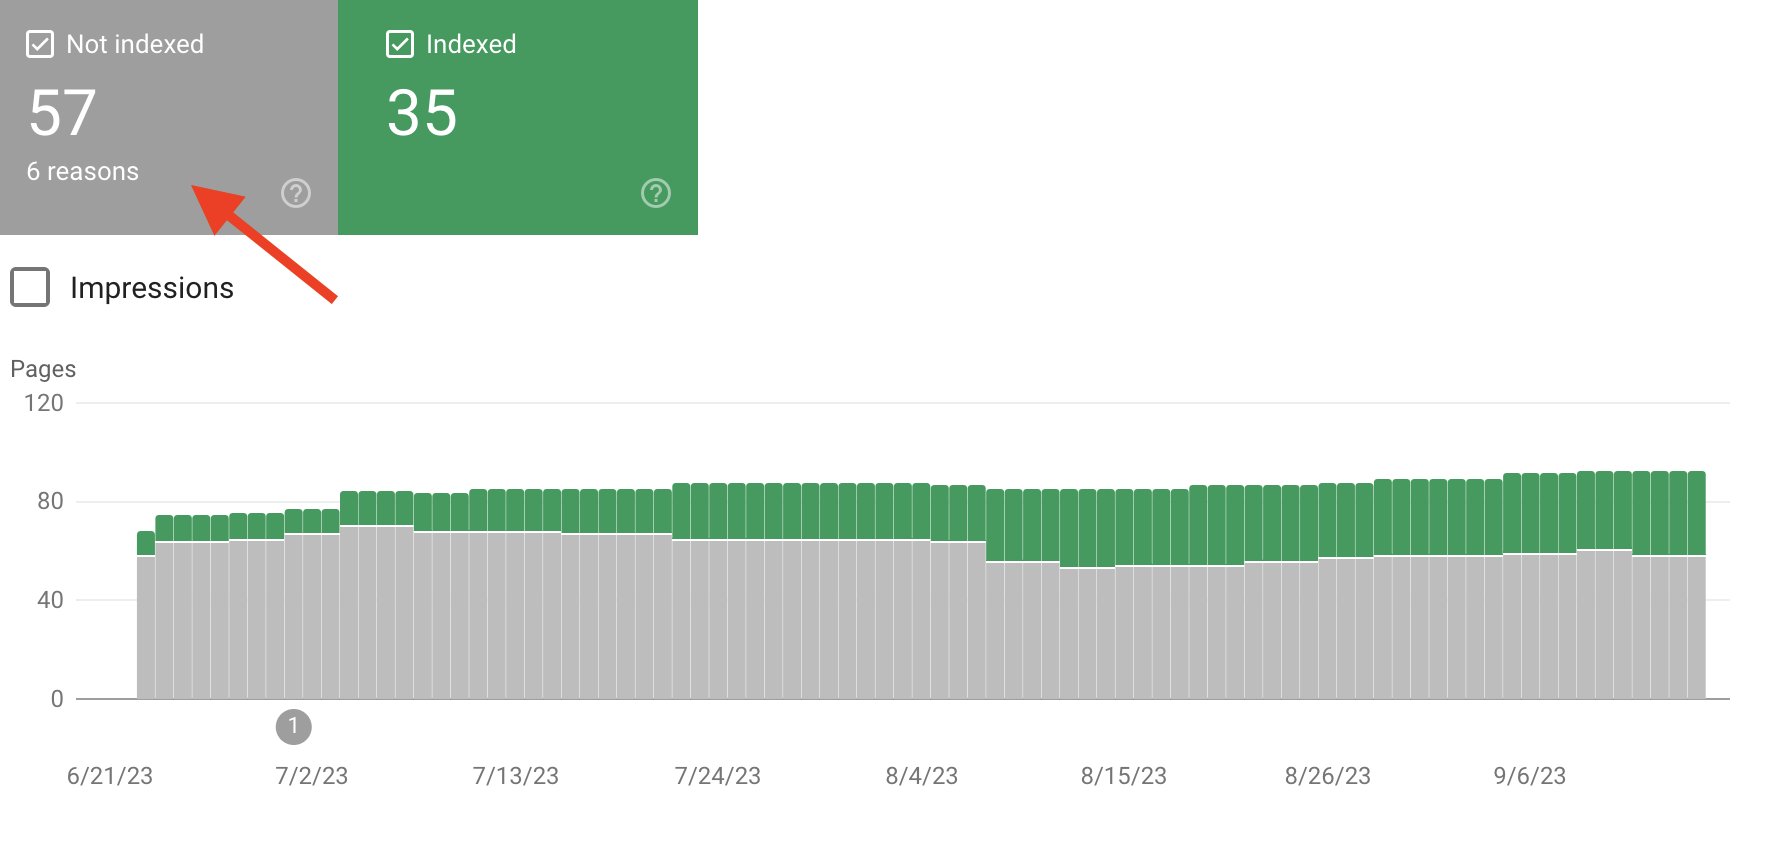
2. Select ‘Not indexed’
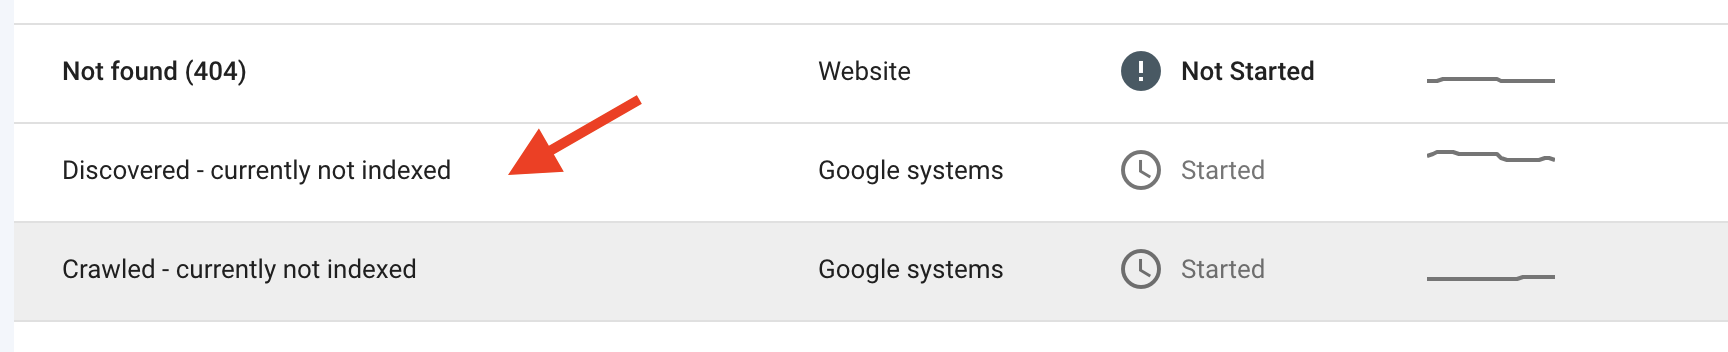
3. Select ‘Discovered—currently not indexed’
Rename and Redirect Your Blog URL Slugs
Make a list of the URL slugs of the affected pages so you don’t lose track, because once you delete or change the old URL, you might not remember what you called it and you’ll need to have a record of this. I suggest using a spreadsheet to keep track. It’s not rocket science, you can do this.
We’re talking about 2 columns here.
In the first column make a list of the current URL slugs. In the second column, make a list of what you will rename them to…it’s not complicated.
Don’t forget to include the /blog as part of the URL slug. This is part of the URL slug and if you don’t include it, this won’t work.
For example, if your blog post URL is www.yourwebsite.com/blog/old-url, then the slug is /blog/old-url, even though there’s only space in the settings to type old-url. Got it?
Now head over to your website and change the URL slugs of the affected pages.
Depending on how many you have, you may want to do this in small batches since your current URL is floating around out there in cyberspace and someone just might click on it.
After you delete the old URL and replace it with the new one, you’re going to add URL mapping in developer tools.
Edit URL Mapping in Developer Tools
After you’ve changed the URL slug, you will add the URL mapping in Developer tools.
Select Settings > Developer tools > URL Mappings
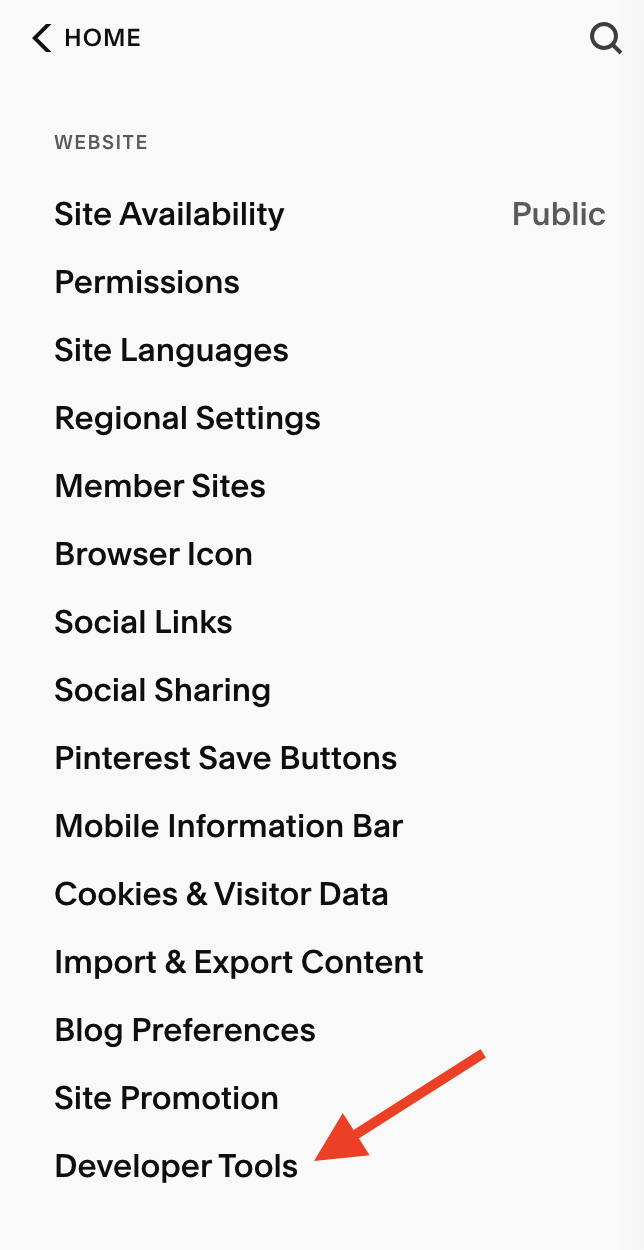
1. Select ‘Developer Tools’

2. Select ‘URL Mappings’
Now enter the old URL slug.
So it will look like this:
/blog/old-url
Then you will add a hyphen and an angle bracket so it looks kind of like an arrow. Now you’ll have something that looks like this:
/blog/old-url ->
Now add the new URL slug. It should look a little like this:
/blog/old-url -> /blog/new-url
Lastly, add ‘301’ to the end. Your final product should look something like this:
/blog/old-url -> /blog/new-url 301
Don’t forget to hit save!
Now test it. Open up a new tab and type in the new URL just to make sure you did it correctly.
If all looks good, go to the next step.
Request Indexing of the Page with the New URL with Google Search Console
Head into Google Search Console.
Put the entire new URL in the box at the top where it says, ‘Inspect any URL in “https://www.yourwebsite.com/”. It will look like this:
https://www.yourwebsite.com/blog/new-url
Hit enter and let GSC do its magic. It will tell you the URL is not on Google because you literally just created it.
You’ll see a box that says, “TEST LIVE URL.” Click it.
It takes a few seconds so be patient!
If you get all green check boxes from Google, you can now manually request indexing by selecting “REQUEST INDEXING.”
You’ll get this response from Google:
URL was added to a priority crawl queue. Submitting a page multiple times will not change its queue position or priority.
In other words, just walk away, your work here is done.

1. Put the new URL in this box
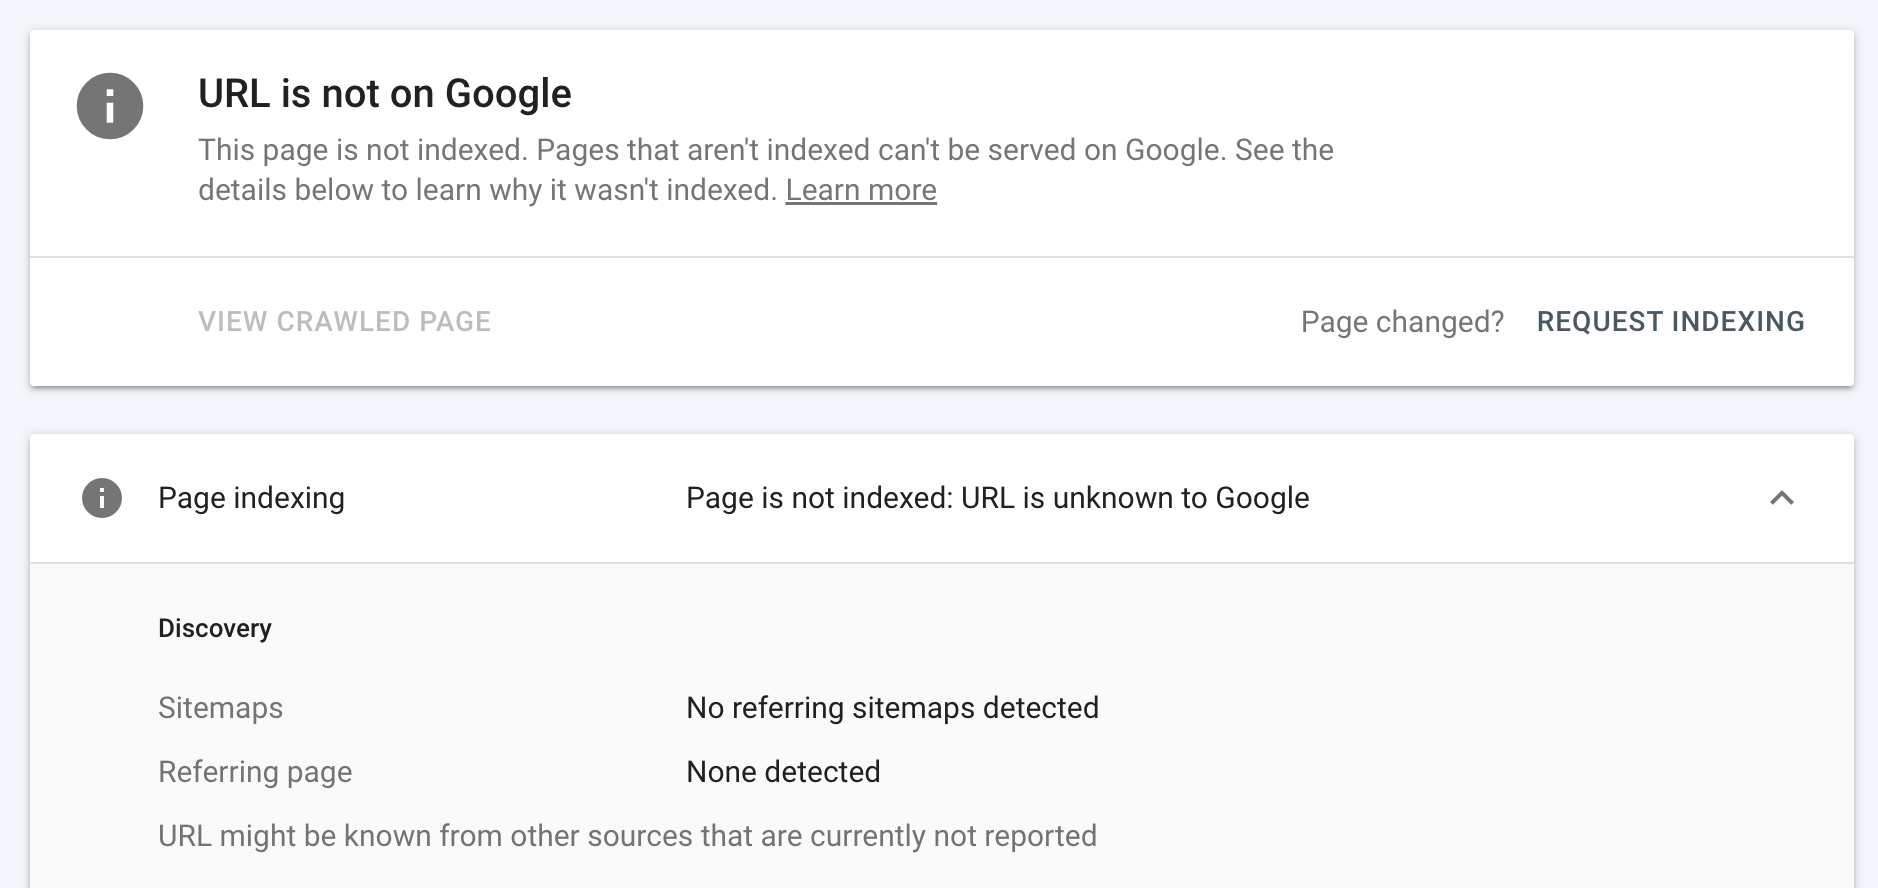
2. It will tell you the URL is not on Google
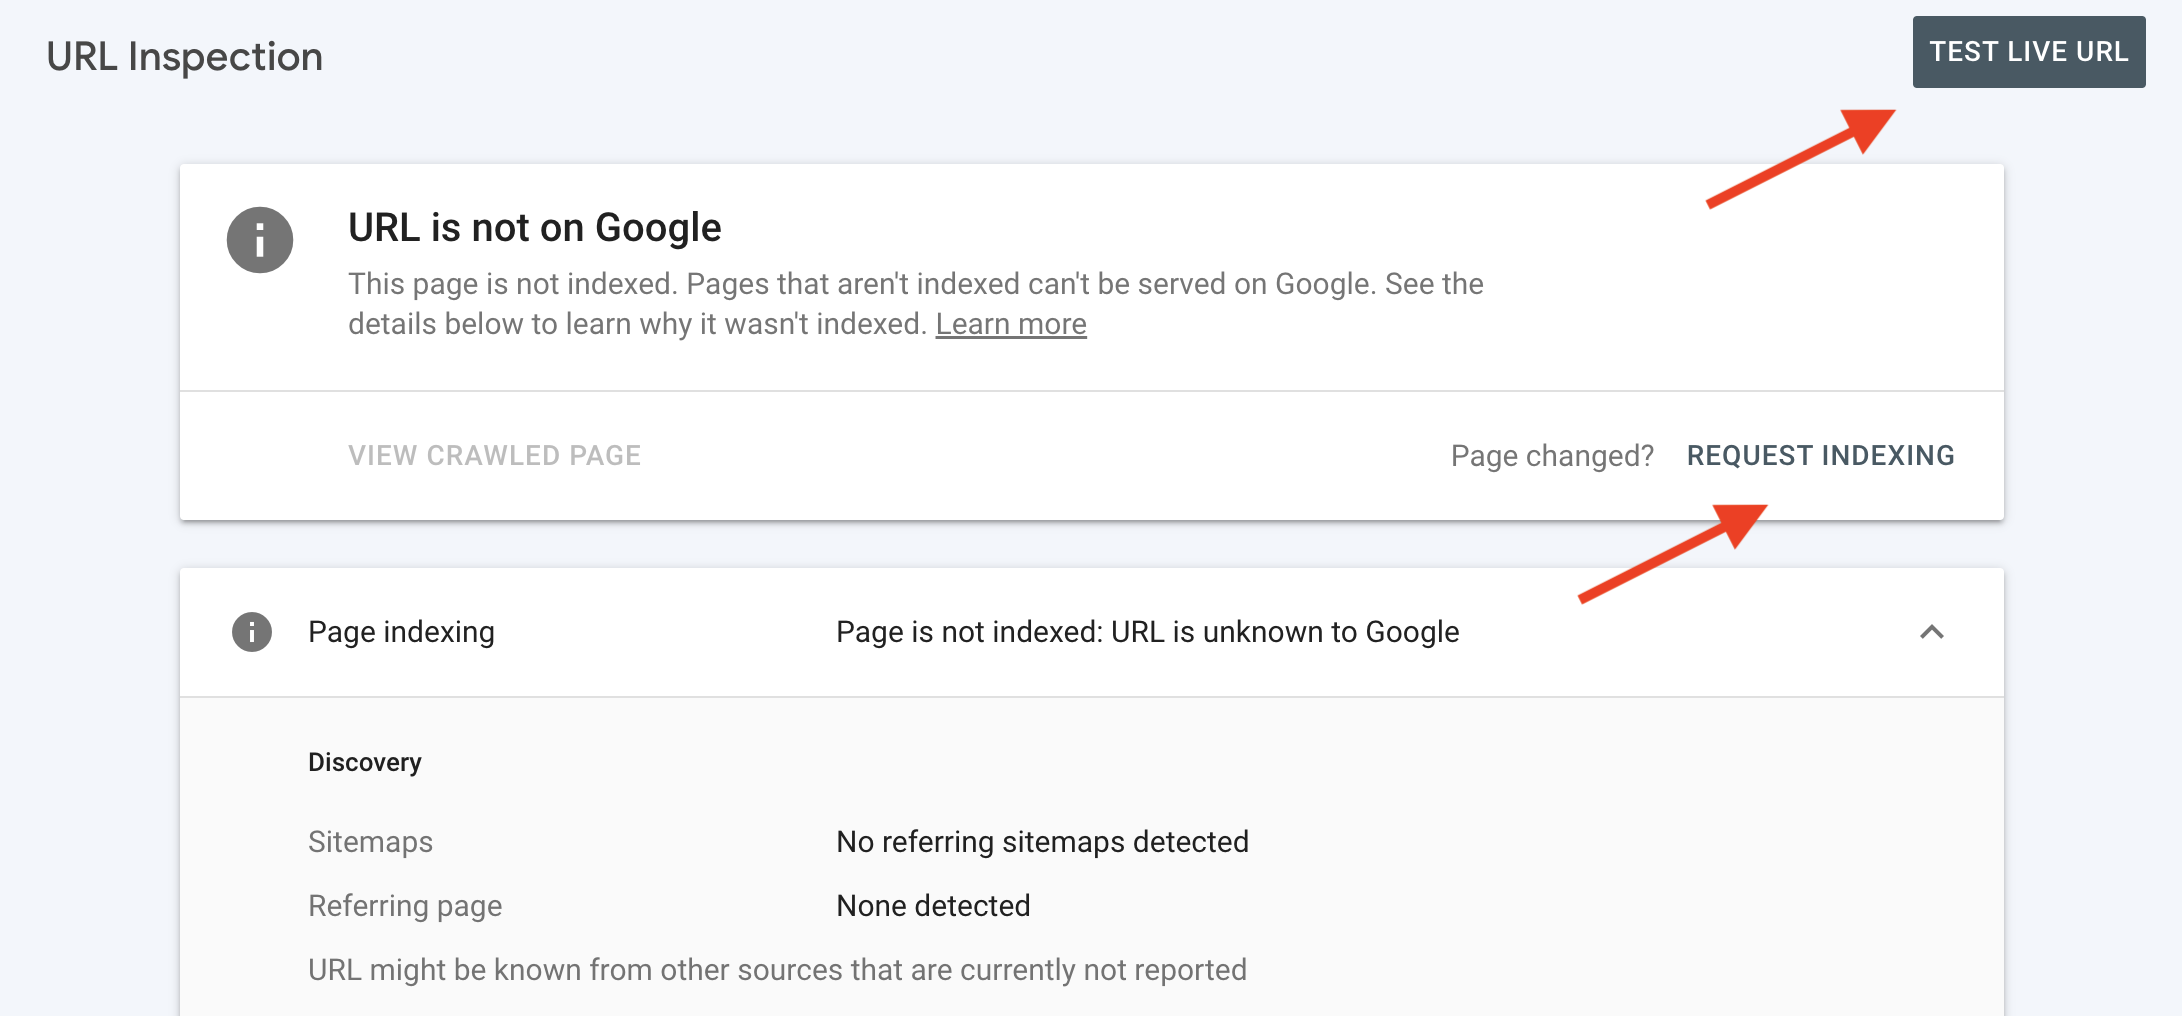
3. Select ‘Test Live URL.’ If you get all green checkmarks, Select ‘Request Indexing.’
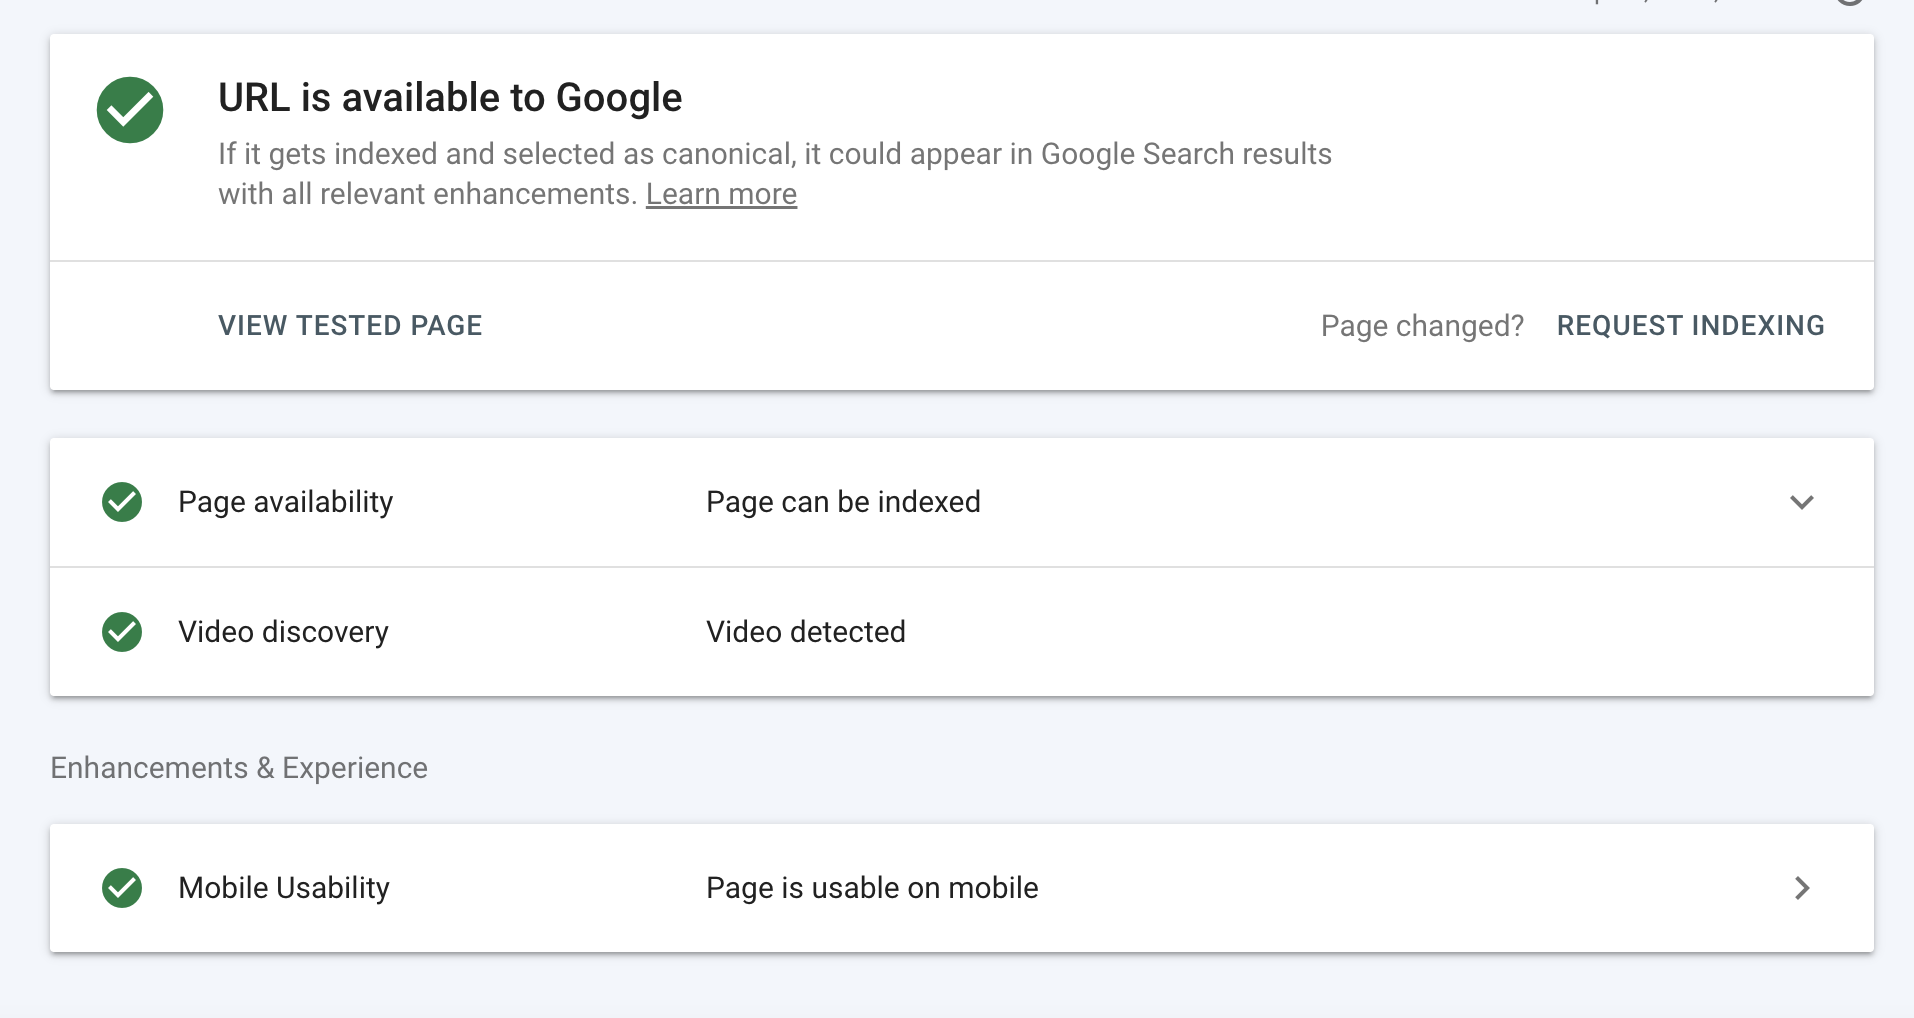
4. All green checkmarks means it’s okay to index.

Cross Your Fingers
There are many variables when it comes to SEO and not everything is a quick fix, but I can tell you that this has actually worked for me…so far.
Try this and let me know how it goes.
I’m serious! I want to know. Have you had issues getting blog posts indexed? What worked for you? Or are you still stuck on this? Tell me in the comments. 👇
This page contains affiliate links